26 December 2013

Pinterest Project #1: DIY Lego Table

One of my kids is obsessed with Lego. So this Christmas we set out to find him the perfect building station. It had to be

  1. Portable: to keep floor space open
  2. Inexpensive: Who knows if they will outgrow it in a the next year.
  3. Large Enough to fit multiple kids building but not take up the entire room.
  4. Easy to DIY: time is a luxury in this busy family.

There were tons of inspiration on Pinterest


Any of those would have been perfect options, they would all be easy to recreate. But... 
Ultimately we decided to go with this one: 
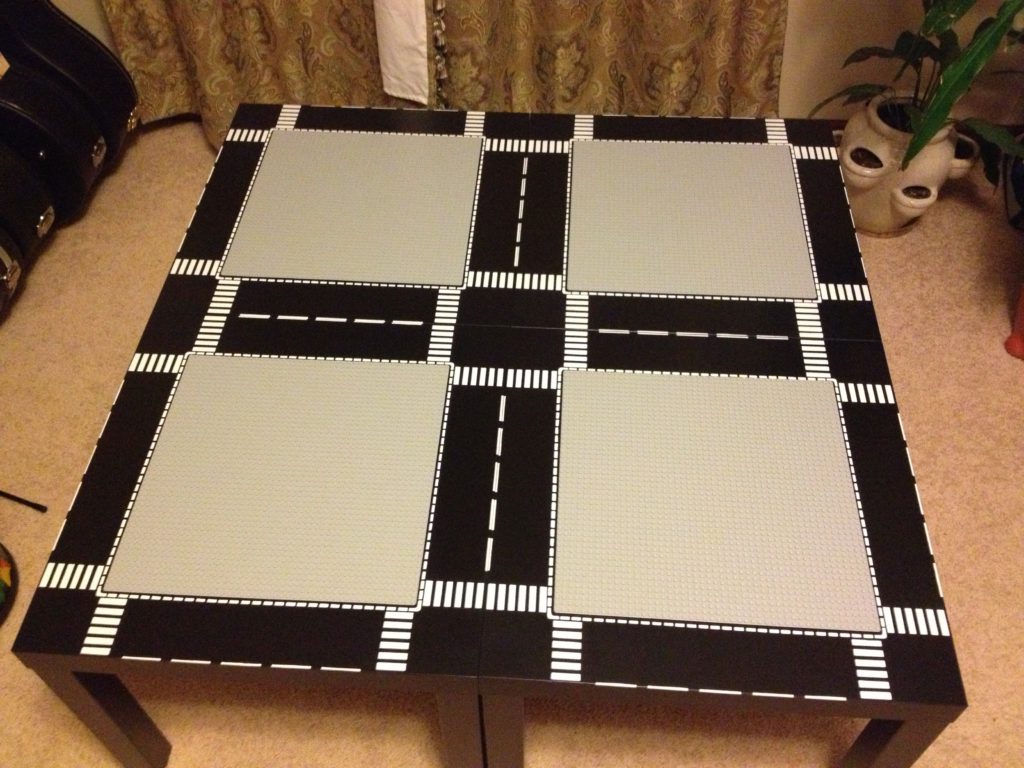
It screamed PERFECTION! the moment I laid eyes on it via Pinterest. I followed the link and landed on a pictorial of exactly how to recreate this masterpiece. Only 1 thing was missing, the details on how to create the road lines with such exactness. I took a chance and left a message on this year old post. What do you know the original poster responded with such kindness and actually shared the printable templates. It took some trial and error on my part (no reflection on the project) I couldn't get the stencil cut out properly. 
I learned a few things while doing this table project.
 #1 use a thicker material to make the stencil, posterboard was too flimsy the paint bled
#2 On table 2 I tried temporary spray adhesive to take it in place, it left a messy residue
#3 Odorless Mineral Spirits is a must for cleaning up mistakes with spray paint
It turned out okay for working on it Christmas Eve while the kids were sleeping. A few touch ups with a oil-paint sharpie and all will be fine. Still 2 tables to be done and I will take my time so they come out sharp. 
Here is my little Lego Fan and his new DIY building table:
Oh, I forgot to mention that we left the legs off until we move to our new place. Not sure if we will have a playroom where he can spread out. So for now he is playing with them on the floor and we can pack them up for storage. He has played with them for hours and has filled up this part of the lego town.
Thanks, EGress123 for so graciously sharing your idea with me.


18 September 2013

Finally made the switch to Bloglovin

I have been away from the blog world for some time and missed out on all my fave bloggers since Google Reader was discontinued..I like to keep up with tons of inspirational blogs so I need a feed reader to make quick work of seeing what's new in craft land.

Sooo, I have finally made the switch to Bloglovin. I should have made the switch when Google was doing the export of my RSS feed. alas, I didn't so now I have to manually do it..Ugh! pain. But I'm slowly getting it done and cleaning up my roll. I didn't realize how many blogs I followed that aren't active anymore or that don't appeal to my current crafty needs. (like those follow me contest entries)

Have you made the switch to Bloglovin.com? If so add me to your list...

Follow my blog with Bloglovin

27 March 2013

Stampin' Dymonz Creative Space: Ning-cleaning Give-A-Way!

Stampin' Dymonz Creative Space: Ning-cleaning Give-A-Way!: By now you've heard the news -- we're moving.

If you haven't heard, the Stampin' Dymonz ScrapShack Village  is moving to a new 'neighborhood'. If you weren't already a member of the Village then what are you waiting for..Join in on the fun now!!

02 November 2011

Howdy Partner..


Found the pattern for these chaps online           @ Sew a Straight Line

22 August 2011

I think it's time for a blog overhaul..

I realize I don't post very often to my blog. The times where I do post, It's usually just a quick catch up post of pictures. So I'm thinking if I redecorate the blog and reorganize it then maybe I'll be more inspired to spend time here.  We'll see..

31 July 2011

Playing Catch up.(.Again)

 Altered Coaster for "Off the Page" group on http://StampinDymonzScrapShack.info 
Challenge for the week was to use Polymer clay

July 2011 Tag Swap
StampinDymonzScrapShack.info
Theme: Domestic Goddess
Challenge: Use a witty sentiment
Image via Google
 July 2011 ATC Swap Club
StampinDymonzScrapShack.info
Theme: Fashion
I used Stencil Collection Pastels to draw everything except the Head it's a stamp
Then embellished her with pen doodling and textured paper
July 2011 ATC Technique Swap
Rubberstampchat.net
Technique: Acrylic & Alcohol
(learned from 48chic48 on youtube)
 Threw this in here...Made these during a Wilton Demo at Michaels..
 Altered Bottlecap Swap July 2011
Rubberstampchat.net
Theme: Artist Choice
I used a $1 stamp & shrink plastic, pre colored caps from Michael's, an Inkadinkado Inchie swirl stamp

Here's the finished cap, I added glossy accents and microbeads
 Made these butterflies following 2 tutorials found on the web
I'm so addicted to making these little fabric embellishments,
August 2011 Fabric Embellishments Swap
Scrapbook.com
Theme: Artist Choice

27 June 2011

Altered CD Pictorial

Step 1: Sand the surface to remove the label and prepare for painting. (forgot to take pictures early so I had to snap it during the next phase but you get the idea, right..)

Step 2: Punch holes through the label side (to prevent cracks) with a Crop-A-Dile or Big Bite. You can put tape around the edge and punch through and it will prevent cracks as well but then you gum up your punch.
Step 3: Paint with your favorite acrylic paint. I chose Making Memories Celery. Then After its dry I did a simple blanket stitch around the edge to prepare it for crocheting a border.

Step 4: This was a simple scallop border pattern I learned from www.youtube.com/conicuts super easy and quick.


Step 5: I put a chipboard sticker from K & Co. Flora Fauna collection over vellum so you could still see the bones of the CD. I like the idea of knowing it's humble beginnings.

Step 6: Added Stickles & Studio G glitter glue to embellish the diecut.
Look at the dimension. So cool.

I decided it needed just 1 more thing and added some clear plastic drops to the butter fly body and pink flower center.

For my CyberBuddies

friends Pictures, Images and Photos

Bio

My photo
I love to learn new hobbies and can't stop adding to the long list of crafts I enjoy.